Tiny House Trailer Design and Build
This is the first of a series of posts and videos that will detail the design and build of our tiny house trailer. Going down the custom DIY approach opens you up to a number of decisions that would be greatly reduced with a bought trailer. The custom approach has been much more flexible and for us personally it has been more enjoyable. This post outlines the components we have used and why, with following posts going into more detail about the design and build.

Specifications
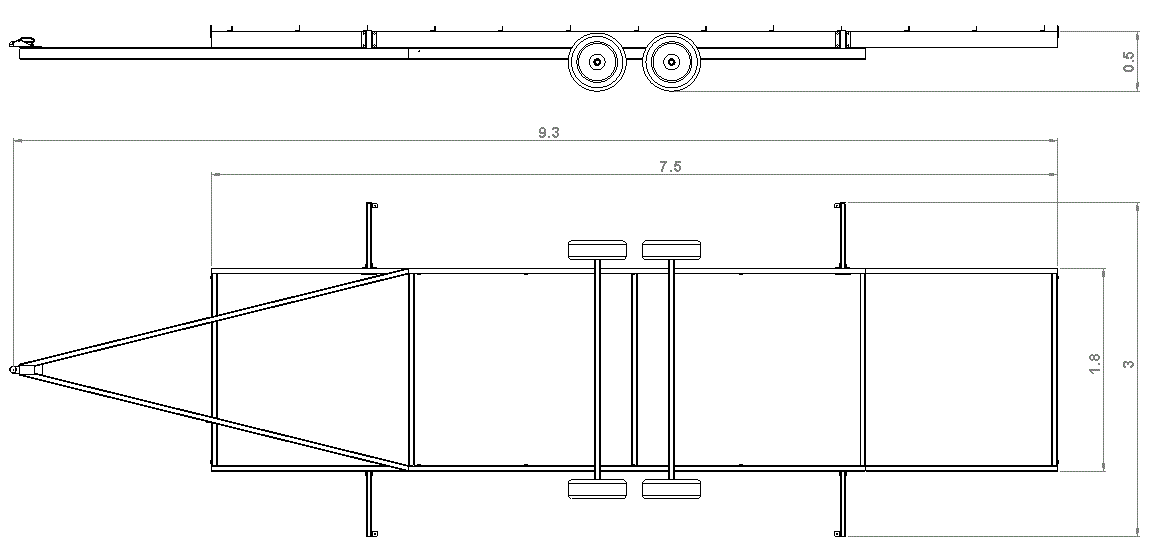
The floor is 7.5m by 3m giving a floor area of 22.5m². The metal weight of the trailer 370kg and the complete trailer assembly including wheels etc is 450 kg.
Steel
All steel was supplied and delivered by the good guys at Easy Steel in Hastings. I highly recommend this company as they were great to deal with. I used simple rectangular hollow sections (RHS) because they are cheaper compared to C section and I beams.

The top section uses 150mm x 50mm x 3mm mild steel. Where the bottom section uses smaller 100mm x 50mm x 3mm. The two axles use 50mm x 50mm by 5mm. All steel is supplied in 8 metre lengths only so we maximised the usage of the material where we could.

Balancing
10% of the trailer load should be on the coupling to ensure a smooth, efficient and safe tow. If there is no load (0%) on the towbar , the wheels would be positioned under the center of mass, just like a seesaw. To place load on the towbar the wheels need to be positioned back from the center of mass. This can be worked out by hand calculations or 3D modeling the complete house and contents. 3D modelling has the advantage of calculating the center of mass in real time, meaning if the contents changers so does your center of mass. To get an accurate result all items must have correct weight and density.

In our case we set the axles 330mm back from the center of mass. 330mm / 3750mm = 0.1 or 10% (I have excluded the tow bar as weight is minimal). In this case the house is not being towed at high speed, so this consideration is not as important as it would be if it was.
The other centre of mass which is very important for even towing is side to side. The mono pitch or shed roof design does not balance well with more weight on the left side. This can be offset with the items inside the house. Kitchens cabinets, ovens and fridges are relatively heavy and need some thought to balance the house as best as possible. The center of mass of our house is 26mm of center which will be fine.

Lifting
As this trailer is going to be lifted by hiab truck the lifting points a very important in terms of taking the weight. The crane on the truck hooks onto the trailer at four points to balance the load. Again I have balanced this load by placing the lifting points cental for the 3.5 tonne load.

Above is a side view of the house showing the two lifting points for this side of the house located near the bottom of the image. The red lines are simulating the crane lifting the house like the following image.
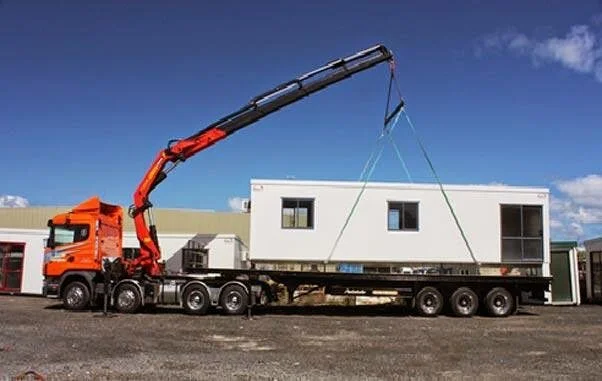
The black and white circle is indicating the center of mass. So the center of lifting indicated by the blue line is close to the center of mass meaning the house be lift square.
Wheels
We are using new low profile 13 inch tyres with galvanised rims and hubs. These were supplied by Wheels Plus, Hastings. Each wheel can handle up to 900 kg each, totaling 3600 kg to handle the 3.5 tonne load.

As the wheels will only be used to move around site you could say these are overkill as they will not be used at speed on the road. We looked into second hand wheels but could not find anything that would take the weight with a small diameter. As the house is 3m wide the wheels had to go under the floor meaning we had to find the smallest diameter wheel that would take the load. Every millimeter of height is key to create a sense of space and accommodate the raised level over the bed, see Tiny house concept design 2.0.
Coupling
The 2 tonne CM trailer parts coupling from BNT Napier suits 1 7/8 ball. 3.5 tonne couplings are available but are double the price and again for us will not be subject to bouncing at high speed down a rough NZ road.
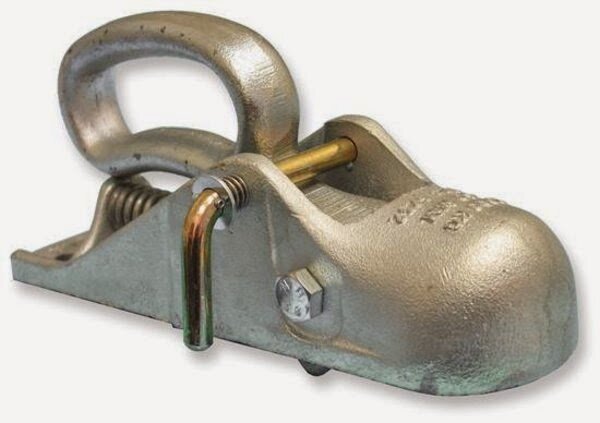
Also there are couplings that handle both size standards of 1 7/8 and 50mm, again expensive. 1 7/8 equals 47.6mm making a difference of 2.4mm between the two meaning they can be mismatched leading to poor coupling to ball connection. Unfortunately in New Zealand we tend to run the two sizes with a battle from each camp as to which is better. Always check before hooking up and change the ball if necessary.
Fasteners
Bolts, nuts and washers were supplied by EDL Fasteners, Napier. The fasteners are used to hold the two main trailer sections together. Also to secure the the lifting arms and coupling to trailer. The reason for using fasteners at these locations will be explained in future posts.
Stay tuned for the next post in this series and leave comments and feedback below.