How to Move / Tow a Tiny House Trailer
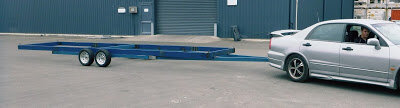
Whether you are choosing to build your own tiny house trailer or have one built for you, chances are you will be moving the trailer from the manufacturing point to the construction site. We designed and built our own trailer and wanted to share the experience of moving a freshly constructed, 9.5m long fabrication down a public road.

We chose to protect the tiny house trailer using galvanisation, see here. Once the trailer frame was completed and wheels and drawbar attached to was time to test the trailer. We used a private location to tow the trailer, putting it through its paces by turning, stopping and reversing and checking everything was ok. Once we were happy the trailer performance it was time to transport it to the local galvanising plant. Fortunately it was only about one kilometre down the road. For this reason we concluded it was safe to transport the trailer on its own wheels for coating. Our trailer is not designed to be road legal and even if it was its would be in no state without lights, brakes and number plate. So deciding to tow down a public road is not technically legal for this short distance we thought it would be safe. We did the following to ensure safely:
Planned and mapped out the route.
Attached high vis to both rear corners.
Conducted the move at a quiet traffic time.
Conducted during daylight.
Used two persons, with one following with communication between the two.
Drove sensibly leaving plenty of room for other road users.
At this point in the build height is not an issue but the length can be. We found the trailer tracked and followed the tow vehicle very well. But we did have to be careful over gutters and dips as when the wheels drop you can run into danger of dragging underside the rear and front of the trailer into the road. We did not have any issues here as the route we chose was wide and flat.

Another option here is to use and truck or trailer to transport your trailer from A to B which would of course be legal and safe but most likely cost $ or a box of beers or two. Or many of the galvanisers offer a transport service like HB Galinvasing will pickup and drop off for a cost.

Once at the galinvaser we removed the hitch and wheels and unbolted the frame and pop on blocks ready for them to coat. Keep it off the ground keep it clean and dry and also aided in lifting for the galvinistors.

After galvanising we needed to clean up the axle stubs to refit the bearings and wheels. One slight error we made was leaving the coated trailer in the yard for a few weeks over which time it rained. This caused the stubs to start rusting which was removed but a bit of a pain and time consuming. Once we had the trailer back together we used the same procedures to transport it back to the workshop for finishing.

As we were traveling a short distance we decided not to grease the wheel bearings. We had the wheels on and off a couple of times so this saved time and money buying grease. Also it avoided the messy clean up in a gravel yard at the galvanises.

Overall the process worked well due to pre planning and communication with involved parties.